The Cheerson CX-10, CX-10A , CX-10C, CX-10D, CX-10WD, CX-10WF and Related Mini-Quadcopters

There are a few variations on the Cheerson CX-10, and it can be a little confusing as to what the differences are.  Here is a quick guide.

Cheerson CX-10 The original
Cheerson CX-10A Adds headless mode
Cheerson CX-10C Adds a camera that can take video or still pictures and save them to an onboard SD card.
Cheerson CX-10D This version adds an altitude hold capability that can make it easier to fly.  This is made possible by a very sensitive barometric (air pressure) sensor.  For some reason it is mainly sold in some hideous rainbow or camouflage colors!
Cheerson CX-10W This amazing version adds first-person view capability (FPV). It has an on board camera the transmits a live image to your iOS or Android phone, which is also used as the controller.
Cheerson CX-10WD This version has the FPV capabilities of the CX-10W and adds the altitude control of the CX-10D.
Fluoreon FX-10 This is a slightly smaller version of the CX-10A (it also has headless mode)

See below for more information on all of these.


The Original: Cheerson CX-10

cx-10 The original basic version of the Cheerson CX-10.

Check price on Amazon. 

For those interested in hacking the CX-10, it looks like there has been at least 3 different PCB revisions. The primary reason for caring about this is if you want to pair to another transmitter such as the Walkera with DeviationTx.  These are identifiable based on the color of the PCB when you open up the CX-10.  There is the Red, Green, and Blue.  There’s a lot of discussion on the Deviation TX board and RCGroups about which firmware is needed with which board (so go there for details), but in general I think that people have been able to make it work with all three versions.

cx-10 picts
Image from RCgroups.com forum post. 

IMG_1064
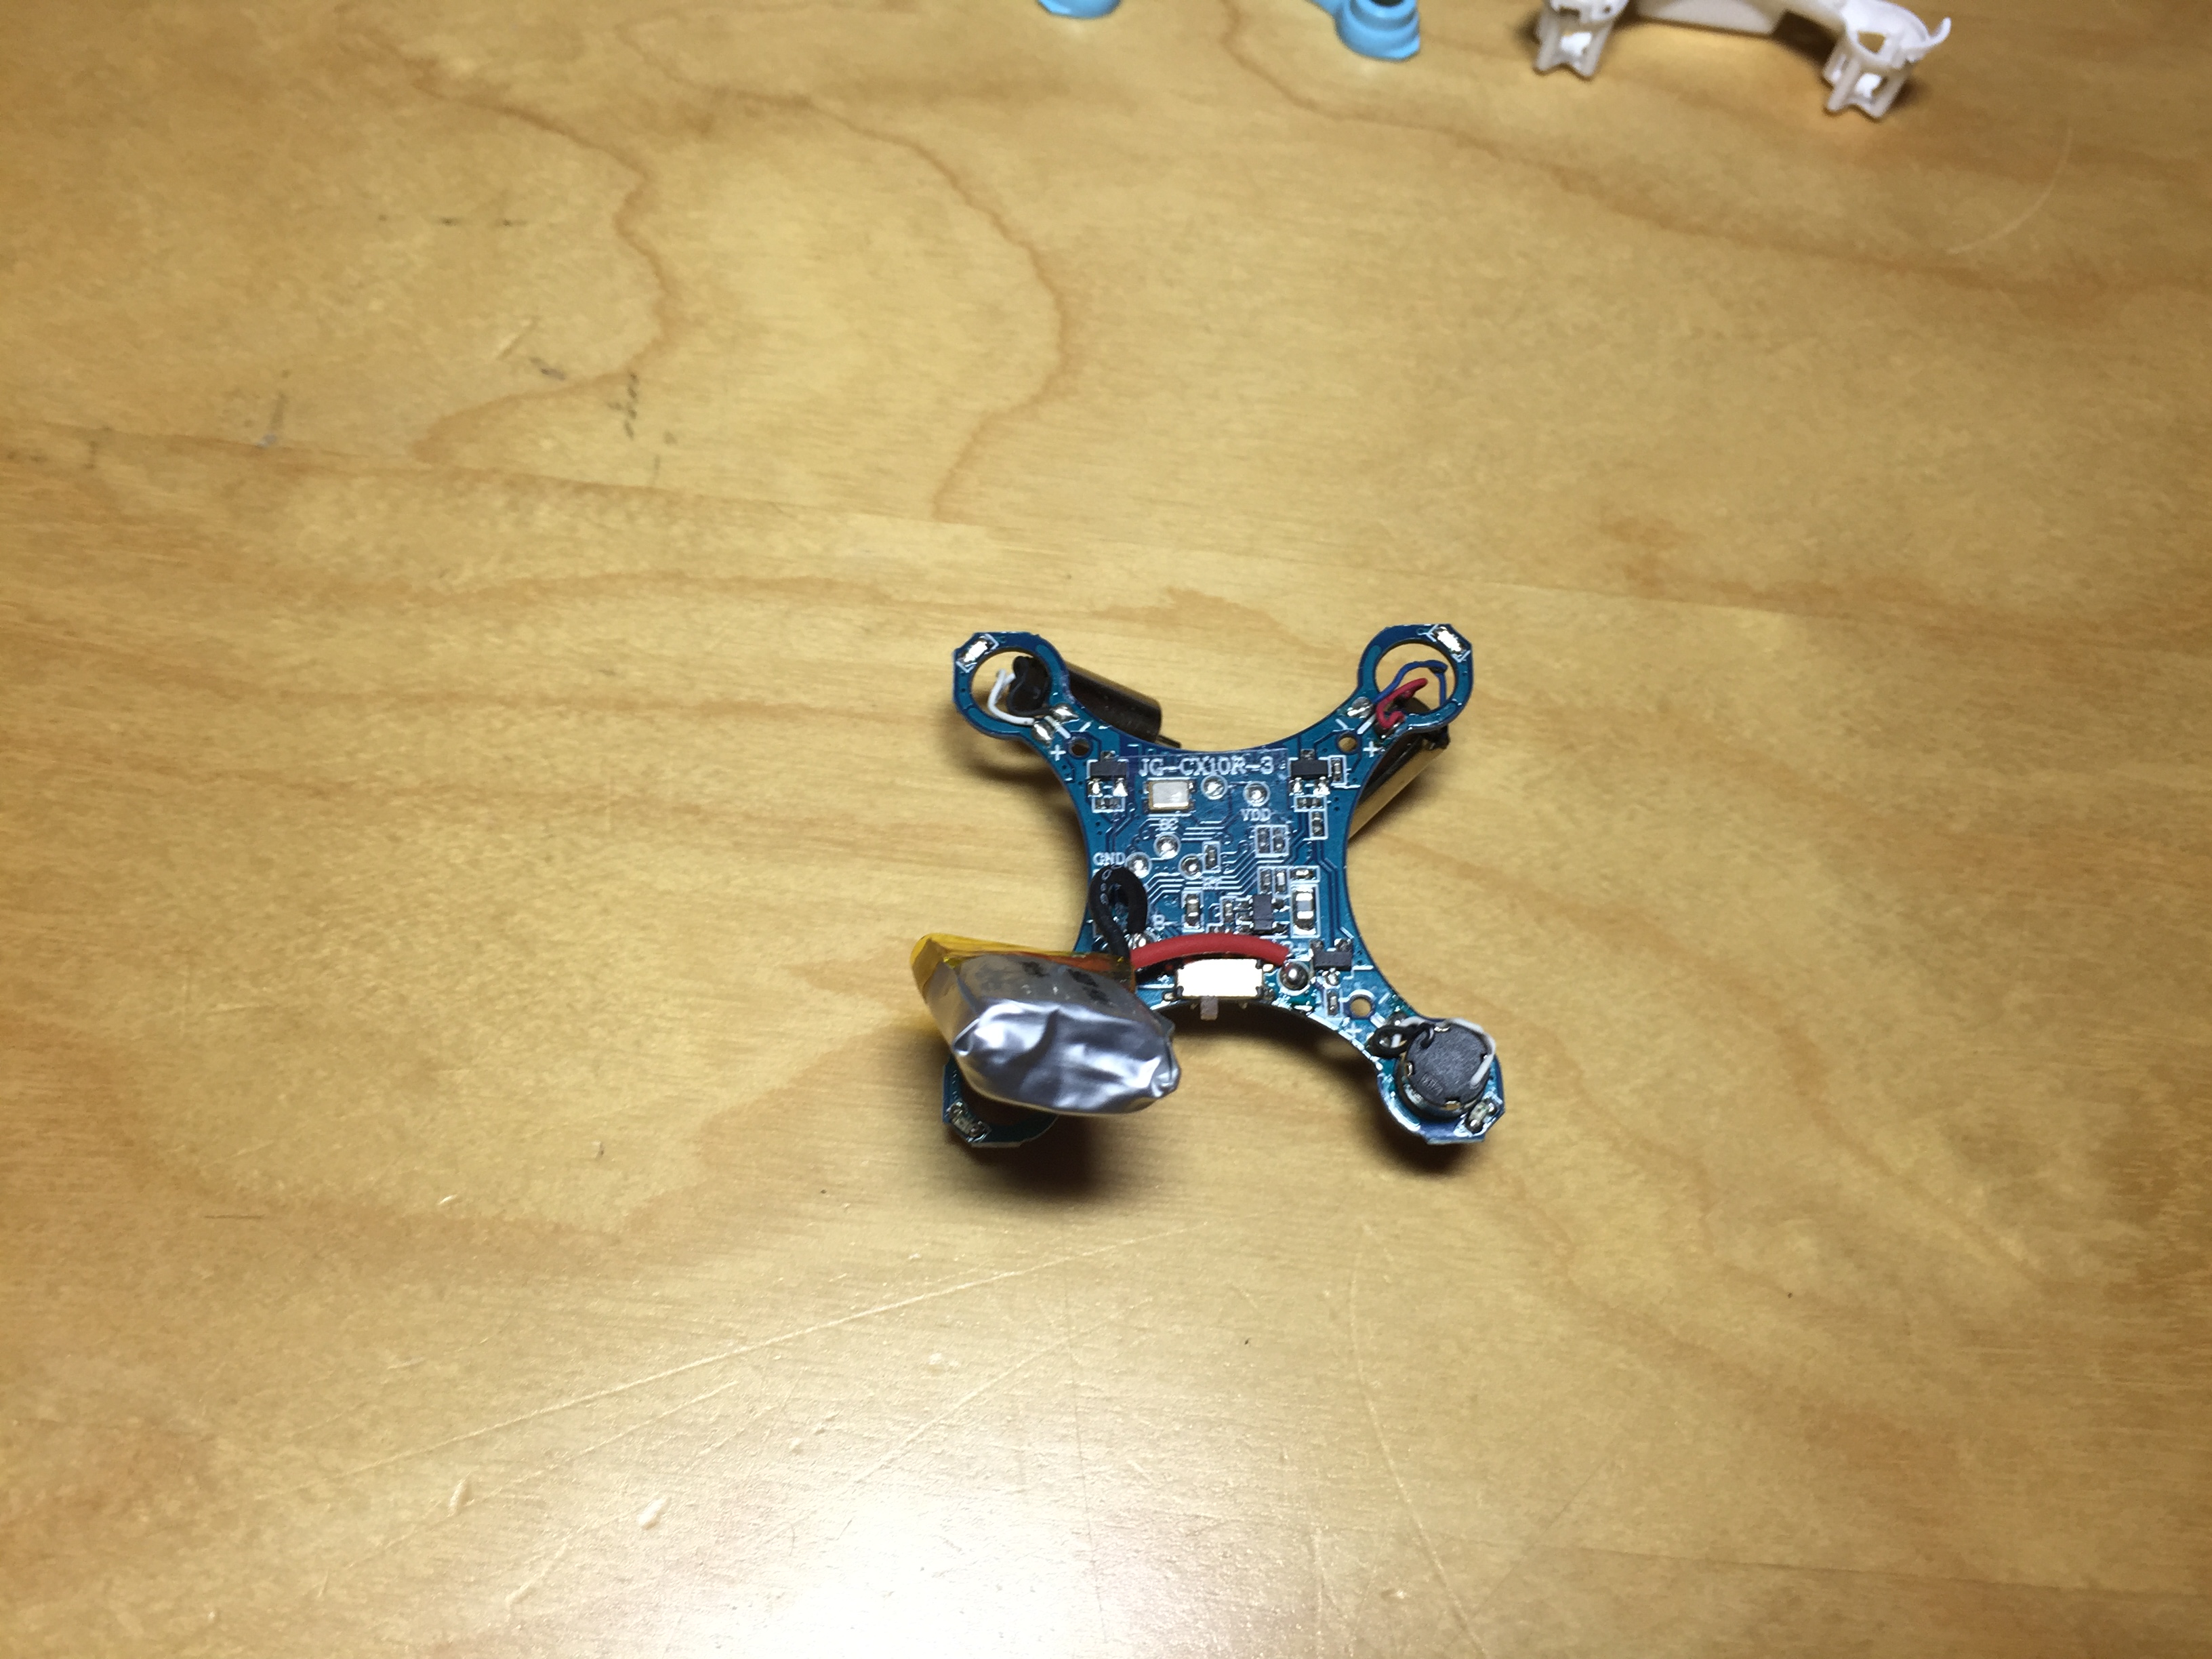
I believe the Red and Green PCB versions came earlier. All of the units I purchased came from Amazon after Oct. 2015, and they have all been Blue PCBs.

The Cheerson CX-10A with Headless Mode

IMG_1118 Cheerson CX-10A Mini-Quadcopter with Headless Mode

Check price on Amazon. 

This is identical to the CX-10, but with an additional flying mode called “Headless Mode.” With the CX-10 and CX-10A in normal flying mode, the side with with the blue LEDs is the front (the “head”) of the quadcopter, and the side with the red LEDs is the back.  The forward/backward, and left/right control (by default on the right joystick of the controller) are all referenced to this “head” orientation to quadcopter.

In Headless mode, the head of the quadcopter stays fixed to where it was based on how it started at takeoff of the device.  This means that even if you rotate the the quadcopter with the left joystick and the blue/red LEDs indicate that the head of the quadcopter is rotating, it will not affect how the left/right controls work. When operating in headless mode, the LEDs will blink on and off (I guess they figure it’s ok for the LEDs to go off because they no londer indicate the heading).

This headless mode can make it less confusing for beginners to fly, but it doesn’t always work that great, so in general I never use it.  However, I have noticed that in headless mode it the yaw rate seems to be reduced, and that overall can make things it slightly easier to fly.

On Amazon, the CX-10A seems to cost about $2-$3 more, but not all the listings are accurate.  I’ve ordered a CX-10A at least once and received a normal CX-10. The packaging is the easiest way to tell the difference (see photos above), plus the symbol on the top middle of the body is different.

This CX-10A is also sold as the Cheerson Q4 where it is bundled with a handly little wrench to help pull off the propellers.

The Cheerson CX-10C with a Camera

Cheerson CX-10C Mini-Quadcopter with 0.3MMP Camera.

Check price on Amazon).  


The difference with this one is obvious, and it’s pretty amazing.  For an extra $10, you get a video camera that can record video or take still pictures to a micro SD card. The video below tells you everything you need to know.

The Cheerson CX-10D

Cheerson CX-10D Mini-Quadcopter with altitude hold.

Check price on Amazon).  


This model adds the altitude hold feature the CX-10A (there is no camera). This is a nice feature for beginners, because keeping the drone at an even altitude is one of the trickier things to learn at first.  Many folks bounce their drones off the ceiling and then the floor a few times before getting the hang of it.  The altitude control feature is implemented using a barometric sensor. There is a nice review of the CX-10D here.  

The Cheerson CX-10W with FPV

Cheerson CX-10W Mini-Quadcopter with Wifi FPV

Check price on Amazon).  


This version adds the amazing ability to stream images from the camera on the drone to your Android or iOS phone, which enables FPV (first-person view) flying.  It is fun to play with, but admittedly, using your phone to fly this is not the best interface.  Here is a thorough review of the CX-10W.

There is a third-party version of the app that enables you to fly via a CX-10C transmitter and then stream and record to your Android phone (the default app disables the transmitter capability once it is on).

The Cheerson CX-10WD with FPV and Altitude control

Cheerson CX-10WD Mini-Quadcopter with FPV and altitude hold.

Check price on Amazon).  


This version adds altitude capability to the CX-10W.  This unit is thoroughly reviewed as well.  

Fluoreon FX-10

The Floureon FX-10 is even smaller than the Cheerson CX-10.

 Check price on Amazon. 

If you don’t have enough room to fly the Cheerson CX-10 then you need a bigger living space, but maybe the Floureon FX-10 can help too. It includes headless mode, and flies about as well as the CX-10. Here is nice video review.

It is also sold as the Cheerson CX-Stars, the Mota JetJat Nano, or the DHD D1.

Mods and Hacks for the Cheerson CX-10

This is a compilation of links describing various hacks on the Cheerson CX-10 mini drone.

  1.  The first one is my own hack where I control a Cheerson CX-10 from a PC using a webcam.
    drone diagram
  2. This is a how-to on converting a Cheerson into a FPV.  Pretty amazing!

Cheerson CX-10 Smallest FPV

3. This post describes how to add shoulder buttons to control the yaw.  This is nice because with the Cheerson controller, when trying to rotate the yaw, the thrust is often inadvertently affected as well.

4. This forum post shows how a different RX can be hacked into the Cheerson.  In this case a DT RX32D was used.  This enabled custom firmware to be implemented.

5. Teardown and Video showing Cheerson controlled by Walker DeviationTX

6. Another Teardown.

7. This Gitub Gist has code for connecting an Arduino to the XN297 chip in the Cheerson TX. Enables one to control the Cheerson via the Arduino, or in this case, using the Arduino to read from another Flight TX into the Arduino.

Arduino Source code

View post on imgur.com


Dancing Penguin Robots!

View post on imgur.com

View post on imgur.com


Here’s directions on how to build a simple vibration robot using a battery holder, a vibration motor, and cable ties. I designed this to be a “maker” craft at my daughter’s penguin-themed birthday party, but I’m sure these can easily be adapted to whatever party theme you need.  Each of the party attendees helped with the final assembly and decorated these robots as penguins so they could participate in the “Penguin Robot Dance Party.”  My robot is the “Tux” robot (a.k.a. as the Linux mascot).

Materials and tools


vibration motor Vibrating motor

This is a DC motor with an offset weight stuck on the end.  They are used in massagers, game controllers, and other items that you want to vibrate.

battery holder AA Battery Holder with Switch

This battery holder has a switch, which is a must-have feature when you want to stop your robot.

Double-stick foam tape

You’ll need about 1 inch per robot.

Cable ties

You’ll only need 4 per robot, but buy some extras because they’re always useful to have around!

AA Battery

I used only 1 battery per robot, but you can use 2 per robot if you want your robot to move faster (see the discussion in the directions below).

Soldering iron

Obviously, only buy this if you don’t have one already.

Solder

You’ll need about an inch of this per robot.

Total cost for each robot was about $2.50 per robot (primarily for the motor, battery pack, and batteries).  The best place to get the vibration motor and battery pack is from Ebay. The other items are all on Amazon.  Click the links in the table above to see the prices.

Directions:

DSC_0346

Get your materials together.

DSC_0349

Solder the leads of the battery holder to the motor. I chose to use only one AA battery per robot.  It works fine with two batteries, but the vibration makes a louder sound, and it was not conducive to a festive party atmosphere.  Shorting out one side of the battery holder with a wire that I soldered allowed me to use just one battery and reduce the noise a bit.

DSC_0342

Use the double-stick foam tape to attach the motor to the battery pack. Attach the four cable ties so the tips point down and they look like legs.

Here is the file with the penguin robot that we let the kids color to decorate their penguins. After they colored them in, just tape it on.  Make sure the paper is not bumping against the motor to reduce the noise.

DSC_0350

You may need to fine-tune the position and angle of the cable ties.  Bending the cable tie of one leg toward the center of gravity tends to make the robot move more toward that leg.  But sometime it doesn’t, so just try a bunch of things and eventually it will work.

One interesting thing we discovered is that these robots can also be setup to follow along a wooden Thomas the tank engine train track.  You might need to tape the train tracks together with a piece of Scotch tape so there is no gaps, and adjust the width of the cable tie legs a bit.  You can either setup two parallel tracks and run “Penguin Races” or setup a loop, like shown below in the video.


The Shenzhen-FBA (Fulfillment by Amazon) business model

Someone asked me how all those electronics vendors in the Huaqiangbei make money. There are so many vendors, and many of them seem to sit there all day with relatively few customers coming by. Many vendors are too busy looking at their laptops or phones to even care if you look at their products (friendly customer service is not a strong concept here).  In fact, the truth is that the one or two piece orders from hobbyists like myself are a distraction to their main purpose which is to sell to other businesses.

Most of the kiosks in the market represent a factory somewhere in China, and their primary goal is to sell large orders to other business.  Throughout the market, you’ll see visitors from India, America, or Europe working with vendors and negotiating large orders so that they can import and resell them. Many of these kiosks also sell through Aliexpress, Taobao, or Alibaba.com, and there is always the sound of packaging tape being used to tape up boxes for shipment for orders placed through these channels.

As you may have noticed from my previous post, a great many of the products in Huaqiangbei are also available on Amazon.  So how do they get there? Let’s take an example:

Bluetooth bamboo keyboard
Bluetooth bamboo keyboard, mouse, and calculator.  They quoted me 240 RMB ($38) for the keyboard.

The photo above is from a booth that sells electronics products that are made out of bamboo.  There are mice, keyboards, Bluetooth speakers, calculators, and many other products.  The finish and quality are actually quite impressive, and there is quite a variety of products.  More products are shown on their website.

Bamboo Electronics Products

Bamboo Electronics Products from Shenzhen Hoyatech website

Suppose you find some products here and decide you want to make some money re-selling.  Here’s what to do:

Step 1: Setup Fulfillment by Amazon (FBA)

The process is a bit complicated, but it’ll save you time and headaches in the long run.  If you’re successful at this, the last thing you want to be doing is packing and shipping boxes every day.

Step 2: Make a bulk order

Contact the factory and negotiate a bulk order (which will probably have a minimum order value of several thousand dollars). Most all of the kiosks here will give you a business card with some sales director to talk to.  Many of the vendors work with FBA companies all the time, so they’ll know exactly what to do with regards to packaging and shipping. Reading and writing Chinese is a big help in this phase.

Step 3: Profit.

There are lots of companies doing this already (two examples in the table below),  you’ll want to differentiate by developing a brand and maybe even your own storefront to maximize your profits.

Sourcingbay 100% Bamboo Wireless Handcrafted Keyboard Eco-friendlyBluetooth keyboard and mouse
Impecca Full Bamboo Wireless Keyboard and Mouse (KBB600CW)Bluetooth keyboard and mouse

It is obviously quite a competitive business area, but at least some folks are making money out of it.


The Amazing Shenzhen Electronics Market

Shenzhen China has been getting some notice lately as a great place for makers who are building electronics.  I recently had a chance to visit there, and it is truly an amazing place if you love electronics.  You can buy lots of finished electronics (including name-brands as well as knock-offs), but what makes this place special is all the component vendors.

My favorite spot was the two entire floors of LED lighting vendors in the mall located approximately here. There was LED bulbs of all types, as well as ribbons of LEDs, christmas lights of all kinds, and all sorts LED controllers. Here is some of the goodies I came home with.

RGB LED rope (5 meters) with controller, remote control, and 60W power supply

This is a 16.4ft long string of SMD LEDs that comes with a controller and remote that can change it to many different colors.

LEDs when color is set to green
LED rope when set to Green color
LED rope blue
LED rope when set to Blue color
LED Rope (5m) with a LED controller, remote control, and power supply
LED Rope (5m) with a LED controller, remote control, and power supply: 65 RMB ($10.50)
SMD LED Rope
Close-up on the LEDs when not lit

This was the favorite item I picked up during this trip.  It is sold at multiple kiosks, so it’s not a rare item, but it’s good quality and very fun to play with. It cost 65 RMB, which works out to about $10.50 US.  (35 RMB for the 5 meters of rope, 30 RMB for the power supply and controller). I’m still trying to come up with a good project to use this in.  It seems to be used quite commonly in various maker projects on the web, like for lighting up this quadcopter.

Quadcopter-LED-Light-Kit-300x300

Like many items in this market, you can buy the LED Rope and Controller on Amazon also.

Extremely Bright LED flashlight with aluminum housing, Li-Ion batteries, and charger

Skyfire LED flashlight
This is an extremely bright three LED flashlight.

If you’re a security guard looking for a flashlight that can be used to blind someone, then this is the place to come. There are many vendors selling an assortment of flashlights.  I liked this one because it is extremely bright and has a very sturdy aluminum housing. The brightness is impressive – this one has 3x LED chips but they actually sell a version with 7x or 10x  LEDs.  My retinas feel pained just imagining how bright it is.  It runs off of 18650 Li-Ion batteries which I purchased with it as a set and came with a charger.  Total cost was 160 RMB ($26).

They sold me a set of 4 batteries, but it turns out the flashlight runs very happily with just 2, or 3 cells (they are all in connected parallel inside.

Charger for Li-Ion flashlight batteries
Charger for 18650 Li-Ion flashlight batteries. Yes, the batteries are really branded with the name Ultrafire.

Is Ultrafire really the best name for a Li-Ion battery where the primary safety concern is that it could overheat and start a fire?  It’s like naming an airplane BigCrash.

The flashlight itself is made by a manufacturer called Skyray, and it is also sold on Amazon by various resellers. See my next post where I describe how all this stuff ends up for sale on Amazon.

Here are some good blogs that give an overview of this market:

There is also a nice article in the June Make Magazine.

Windows 10 is not for me

Windows 10 is going to be released on July 29th, but one feature that many cordcutters will be missing is Windows Media Center.

Windows 10 discontinued Windows Media Center
I guess none of those devices is an HTPC.

I am still happily running Windows 7 on all my PCs at home (I can’t stand the Windows 8 interface), so I was not planning on updating anytime soon.  Microsoft supported Windows XP from 2001 release up until 2014, so I don’t see Windows 7 (released 2009) going away anytime soon. At this point, my only action will be to keep my OS from auto-updating to Windows 10.

However, if and when the time comes, it should be easy enough to move to a new DVR software. There are several pretty good alternatives out there.  My favorite is MediaPortal which is free, and can run on the same exact same hardware that I already built.

Broken television guide in Windows Media Center after July 20, 2015

Perhaps it was just coincidence, but the day before I wrote up my post documenting my build-your-own OTA DVR setup, Microsoft broke the free television guide service for many users.  Apparently they switched providers from Zap2it to Rovi.  I only noticed because my kids started complaining that none of their cartoons were being recorded anymore!

I found a workaround for this issue documented in a blog.  However, my fix was a bit easier than what was described in that post – all I had to do was re-run the initial TV setup.  This can be found by going to Tasks -> Settings -> TV -> Setup TV Signal

Menu for TV Setup settings in Windows Media Center
Go here to find the TV Setup process in Windows media center

Re-running the setup takes a while (it performs a new channel scan), but after about 10 minutes everything was back to normal.

Hope this fixes things for everybody!

Build your own OTA Antenna DVR

If there is anything that inspires this maker to action, it’s a monthly cable bill.  TV is great, but it’s not $100-a-month-great. Luckily, there’s lots of streaming options these days (Netflix, Hulu, etc…), but getting local broadcast networks streamed over the internet is not as straightforward anymore (especially since Aereo got sued out of existence).

Luckily, in most areas of the US, it is still possible to get broadcast networks with a simple Over-the-air (OTA) Antenna.  If you have the right equipment, you can hook it into a  DVR and still enjoy the convenience of time-shifting and commercial skipping.

So there’s two basic ways to do this:

The easy option: Get a Tivo and an antenna.

This is all you’ll need:

Terk HDTVa Indoor Amplified High-Definition Antenna for Off-Air HDTV Reception
TiVo Roamio OTA HD DVR and Streaming Media PlayerThis DVR works for both OTA (over-the-air) broadcast signals and streaming (Netflix, Hulu, etc…).

If you do this, you should probably get the lifetime subscription deal. Plug the antenna into the Tivo, and you’re done!

The Maker option: Build your own DVR from a PC and an antenna.

For those of you who want a little more flexibility from your system, or just like to build things on your own, a HTPC (home theater PC) is the way to go. A HTPC will do a few things that a Tivo can’t – but to be honest the list is pretty small.  For my family, the only important one is that I also use it as a media and file server for storing videos, music, and photos as well which I can access from my other PCs in the house.  We’ve been using our system for about 3 years now, and we’re very happy with it.  It’s easy enough to use that even my 5 year kid knows how to use it to watch her recorded cartoons.

To build it, I basically followed the directions on this blog post, with some small updates.

1. Buy an antenna and tuner

Terk HDTVa Indoor Amplified High-Definition Antenna for Off-Air HDTV Reception
SiliconDust HDHomeRun CONNECT. FREE broadcast HDTV (2-Tuner)

The tuner  converts the antenna signal to something with which your PC will know what to do. I liked the HD Homerun because it connects to the antenna and then to a router Ethernet port. Connect your PC to the same router (either wirelessly or wired), and your PC will find the tuners so that Windows Media Center can record shows from the OTA broadcasts. Having the signal sent through the wireless router makes it so you don’t need the antenna and the PC in the same room (unlike some tuners which require USB connections to the PC).

2. Buy the computer

You could buy pretty much any PC that runs Windows 7, but these Zotac PC’s are quieter, lower power, and are built in a more living room friendly form factor.  Since the system is sold as a barebones system (no memory, no hard drive), these need to be purchased separately.

Zotac Mini PC Barebones System ZBOX-BI320-U

This is a small, low-power barebones PC that fits well into a living room.

Crucial 16GB Kit (8GBx2) DDR3-1600 MT/s (PC3-12800)

16 GB of memory

Samsung 850 EVO 250GB 2.5-Inch SATA III Internal SSD (MZ-75E250B/AM)

250GB SSD. Get the SSD (not a spinning HD).  The time you’ll save in boot-up time and waking up from hibernation will be well worth it. If you need additional storage, you can always buy an extra USB external HD.

Seagate 2TB External HD

Seagate Expansion 2TB Portable External Hard Drive USB 3.0 (STEA2000400)

A spinning drive for extra storage.  Recording stuff in HD can take a shocking amount of space (6GB / hr).

Also, you’ll want an HDMI cable and a wireless keyboard.

BlueRigger High Speed HDMI Cable with Ethernet (15 ft) – CL3 Rated – supports 3D and Audio Return [Latest HDMI version]
Logitech Wireless Touch Keyboard K400 with Built-In Multi-Touch Touchpad (920-003070)

3. Install Windows 7

Windows 7 Professional SP1 64bit (OEM) System Builder DVD 1 Pack (New Packaging)

I opted for Windows 7 because apparently Windows Media Center with Windows 8 doesn’t offer any improvements, and Windows 7 in my mind will have less hardware and software compatibility issues with other items you may be using. [Read more: Is it worth upgrading a media centre to Windows 8? ].

The Windows 7 Home Premium, Professional, and Ultimate editions all include Windows Media Center, so any version except for the Starter is ok. [Update: Microsoft only sells the Professional version now, so you have to buy that one unless you get something aftermarket]. After the installation completes, you will have to do some setup the first time you run Windows Media Center. This will involve configuring it to find the HDHomerun tuner, scanning the airwaves for the local channels, and configuring the TV schedule to show the channels you’re interested in.  All of these steps are described in the HDHomerun documentation.

[Update – added cost summary table] This table below summarizes the cost of this system.

Tuner 75
Antenna 40
PC 170
MEM 82
SSD 90
Ext. HD 85
HDMI Cable 11
Keyboard 25
OS 135
Total 773
[Update] Check out this price comparison of the best OTA DVR options.

Celebrities biking with their kids!

Biking with kids is so much fun, even celebrities do it!

Brad Pitt and Angelina Jolie

angelina-jolie-shiloh-bicycle-02
This is Angelina Jolie and Brad Pitt bicycling with their kids in New Orleans in 2007. They each have a CoPilot Limo Bicycle Child Seat mounted on the back of their bike, and Brad is also towing an InStep Take 2 Double Bicycle Trailer. Two adults hauling around four kids. Not bad!

brad-pitt-bicycle

This is another photo of Brad Pitt in 2006 riding with a kid on a backpack carrier. This photo was taken in Namibia, where they probably do not have bike helmet laws for kids like they do in California. Not the way I’d recommend riding with a child.

Isla Fisher

Isla+Fisher+daughter+Olive+walk+their+mother+_vnGt6RS5tZl
This photo of Isla Fisher and her daughter in 2011 shows them with a child bicycle seat that appears to be a CoPilot Limo Bicycle Child Seat as well. Seems like it’s a popular choice with the Hollywood crowd!

Liev Schreiber

Liev Schreiber Takes His Boys For A Bike Ride
Here is Liev Schreiber carrying two kids in what looks to be a very well equipped bike. I have no idea what equipment he’s using here, but the bicycle and the child carrying attachments looks like some of the accessories I saw in the Netherlands. Leave a note in the comments if you know what equipment this is!


Heidi Klum and Martin Kirsten

heidi-klum-bike-ride-martin-kristen-kids
No child trailers or child seat attachments needed here. This is the goal: having your kids riding on their own!

Start riding with your own kids!

See our other posts on biking with kids: tips for teaching your kid to ride, bicycle trailers, trailercycles, children’s bike helmets, and balance bikes!

The Best Tip Ever for Teaching Your Kid to Ride a Bicycle

I was at the local park with my daughter, trying to teach her to ride without training wheels. I was running behind her bicycle and holding her seat to help keep her from tipping over. This was good exercise, but it was not very effective and eventually gave me a sore back. After watching us for a few minutes, another father at the park came over and said that he had just taught his daughter to ride last week. The best tip that he told me was: “Buy her some some elbow and knee pads.”

So, we went and bought some pads that night. My daughter put them on; practiced falling down on the pavement a few times, and instantly became fearless. The next day, after a half-hour of practice with the pads on, my daughter was able to ride without training wheels. Removing fear from the process made it much easier for her to learn.

A second tip that we used was to wrap a towel under her armpits and use that to help stabilize her instead of trying to hold onto the seat. This allowed her to find her own balance point and still catch her when she tips to one side too much. It also keeps your back from getting all sore.

Pacific Cycle Cars Bike Pad Set (Red)
This set of knee and elbow pads will make your kid fearless. They also come in handy when learning how to rollerblade. Make sure they wear a helmet too!
Huffy Disney Cars Bike with Training Wheels (12-inch)
The main distinguishing feature of this bike is that it has Lightning McQueen drawings on it, but honestly, that was all that mattered for my daughter. The frame is heavy, and the quality of the bike is on par with the other bikes you find at other big box stores. Better bikes can be found, but they probably won’t have the right Disney characters on it. This bike has 12″ wheels. When learning to ride without training wheels, it helps to have a smaller bicycle so the kid can have some extra clearance when trying to stand over it.
Huffy Disney Cars Bike with Training Wheels (16-inch)
This is the same bike as above, just with a larger frame and 16″ wheels.

What tips do you have for teaching your child to ride?

See our other posts on bicycle trailers, trailercycles, children’s bike helmets, and balance bikes!